Difference between revisions of "S17: Logan"
Proj user3 (talk | contribs) (→EAGLE Connector List) |
Proj user3 (talk | contribs) (→EAGLE Connector List) |
||
| Line 238: | Line 238: | ||
| 1X17_NO_SILK | | 1X17_NO_SILK | ||
| M17NOSILK (M17) | | M17NOSILK (M17) | ||
| + | | | ||
|- | |- | ||
|- | |- | ||
| Line 245: | Line 246: | ||
| 1X06_NO_SILK | | 1X06_NO_SILK | ||
| M06NO_SILK_FEMALE_PTH (M06) | | M06NO_SILK_FEMALE_PTH (M06) | ||
| + | | UART3 | ||
|- | |- | ||
|- | |- | ||
| Line 252: | Line 254: | ||
| JST-5-PTH | | JST-5-PTH | ||
| M05JST (M05) | | M05JST (M05) | ||
| + | | Port 2.0 | ||
|- | |- | ||
|- | |- | ||
| − | ! scope="row"| | + | ! scope="row"| Electric Door Strike |
| 1x4-pin | | 1x4-pin | ||
| SparkFun-Connectors | | SparkFun-Connectors | ||
| JST-4-PTH | | JST-4-PTH | ||
| M04JST- PTH (M04) | | M04JST- PTH (M04) | ||
| + | Port 2.1 | ||
|- | |- | ||
|- | |- | ||
| − | ! scope="row"| | + | ! scope="row"| 1-Channel Relay |
| 3x3-pin | | 3x3-pin | ||
| SparkFun-Connectors | | SparkFun-Connectors | ||
Revision as of 09:52, 25 May 2017
Contents
- 1 Logan The Smart Lock
- 2 Abstract
- 3 Objectives & Introduction
- 4 Schedule
- 5 Parts List & Cost
- 6 Design & Implementation
- 7 Testing & Technical Challenges
- 8 Conclusion
- 9 References
Logan The Smart Lock
Abstract
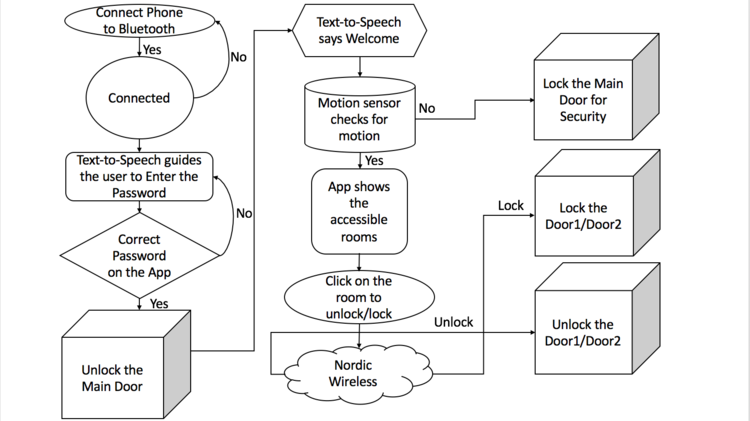
A staggering 1.4 billion smartphones were sold in 2015. An average consumer checks his or her smartphone 46 times a day, and in the US, people do this a collective 8 billion times every 24 hours. Most people at some point lose or forget to bring their key. Our Smart Lock system provides an alternate convenient way of access control on a user's smart phone. Smart Lock can simplify life and increase home security. Smart Lock provides a mechanism to lock and unlock your door with your Smart Phone, using Bluetooth communication with password protection. The door locks/unlocks automatically when the correct password is entered on the Mobile App and the motion sensor senses the motion when a person approaching from the inside towards the exit in order to lock the door to provide security. We are using Nordic Wireless communication to access multiple locks in this project. Another additional feature in the project is interfacing the Text-to-Speech in order to inform/guide the users at every step.
Objectives & Introduction
- Locking/Unlocking of the Electric Door Strike using a Mobile App over Bluetooth
- Design of Printed Circuit Board (PCB) to simplify the hardware system design
- Combination of PIR Motion sensor and Mobile App to increase security
- Accessing the doors using the Nordic Wireless
- Text-to-Speech to guide the User at every step
Team Members
Roles & Responsibilities
- Harsha Gorantla
- Text-to-Speech Module, PCB Design and Complete System Algorithm
- Krishank Mehta
- Hardware Design and assembling, Software Flow, PCB design, PIR sensor and Door Strike
- Prashant Aithal
- Mobile App, PCB Deisgn and Nordic Wireless Communication
- Shruthi Narayan
- LCD, PCB design, Bluetooth and Testing
Schedule
Show a simple table or figures that show your scheduled as planned before you started working on the project. Then in another table column, write down the actual schedule so that readers can see the planned vs. actual goals. The point of the schedule is for readers to assess how to pace themselves if they are doing a similar project.
| Sl. No | Start Date | End Date | Task | Status | Actual Completion Date |
|---|---|---|---|---|---|
| 1 | 03/21/2017 | 03/28/2017 | Project proposal submitted | Completed | 03/21/2017 |
| 2 | 03/28/2017 | 04/04/2017 | Research on the whole system flow and deciding on components Assign individual task Order the components |
Completed | 04/04/2017 |
| 3 | 04/04/2017 | 04/11/2017 | Implementation of the PIR sensor with the SJ one board Initial circuit design of PCB |
Completed | 04/11/2017 |
| 4 | 04/11/2017 | 04/18/2017 | Integration and testing of Electric Door strike functionality Design of PCB for bluetooth, PIR sensor, LCD, SJOne, door-strike related pins on the PCB |
Completed | 04/18/2017 |
| 5 | 04/18/2017 | 04/25/2017 | Integration of door strike with PIR sensor Interface Bluetooth module with SJOne board Design of the Android Mobile app. |
Completed | 04/25/2017 |
| 6 | 04/25/2017 | 05/02/2017 | Verify communication between Bluetooth module and Android app Extending the functionality to multiple locks using Nordic Wireless. |
Completed | 05/02/2017 |
| 7 | 05/02/2017 | 05/07/2017 | Integration of Text-to-Speech module Individual system testing. |
Completed | 05/07/2017 |
| 8 | 05/07/2017 | 05/14/2017 | Integration of the whole system Debugging and testing of the whole system. |
Completed | 05/14/2017 |
| 9 | 05/14/2017 | 05/21/2017 | Final testing and fine tuning Report preparation. |
In Progress | 05/21/2017 |
Parts List & Cost
| Item# | Part Description | Vendor | Qty | Cost |
|---|---|---|---|---|
| 1 | SJ One Board (LPC 1758) | From Preet | 3 | $240 |
| 2 | Battery | From Amazon | 1 | $31.57 |
| 3 | Battery Charger | From Amazon | 1 | $17.50 |
| 4 | Bluetooth Module | From Sparkfun | 1 | $24.95 |
| 5 | Electric Door Strike | From Amazon | 3 | $72 |
| 6 | [PCB] | From PCBWay | 5 | $13 |
| 7 | PIR Motion Sensor | From Amazon | 1 | $9.95 |
| 8 | Relays(1 Channel DC 5v relay) | From Amazon | 5 | $16.50 |
| 9 | Text-to-Speech | From Amazon | 1 | $69.45 |
| 10 | [ Wires] | From Amazon | 1 | $3.95 |
Design & Implementation
System Block Diagram
Printed Circuit Board
Design
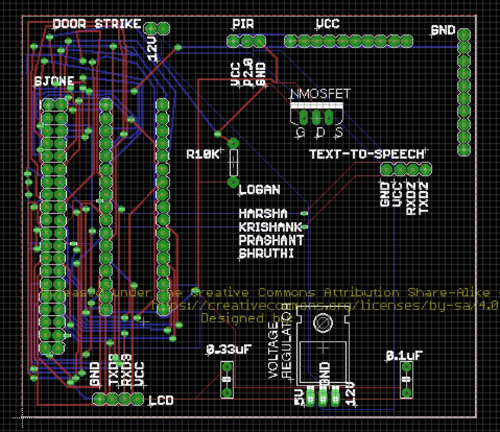
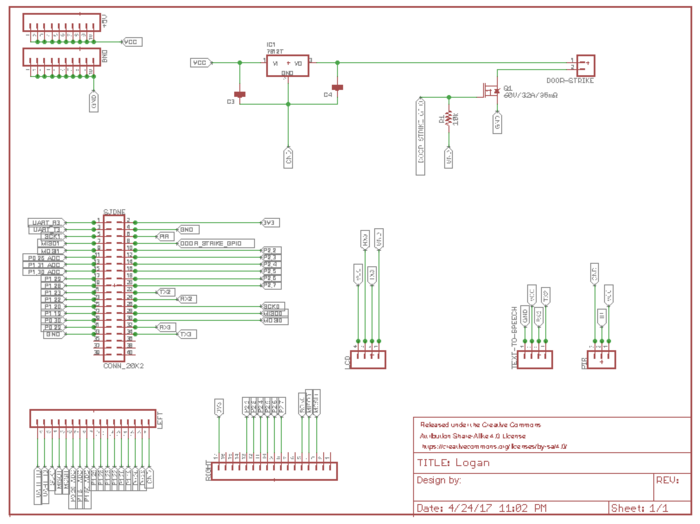
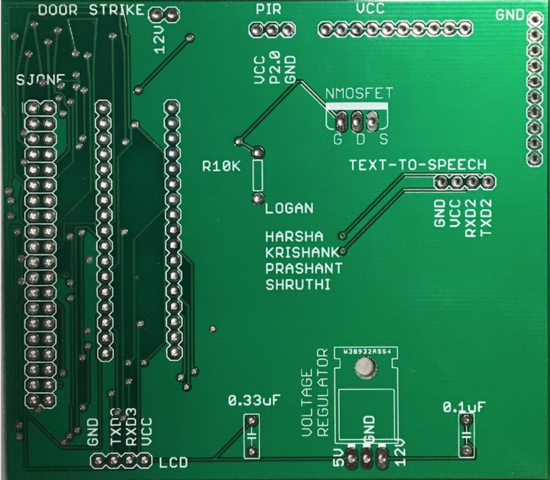
We have designed a custom Printed Circuit Board (PCB) to reduce hardware complexity. The dimensions of the PCB is 3.56 X 3.16 Inch to interface our SJOne board with Text-to-Speech, PIR Sensor, 1-Channel Relay and Electric Door Strike. It is worth designing the PCB as it reduced the hardware complexity and saved lot of wires. The PCB was designed and printed to house the circuit. To design our custom PCB board, we used Autodesk EAGLE PCB software version 8.2.0 which is a free software available online. EAGLE stands for, Easily Applicable Graphical Layout Editor which contains a schematic editor, for designing circuit diagrams. Before starting the PCB design, we downloaded all additional libraries from outside sources such as Sparkfun and Adafruit, to order required components easily.
The tool provides various connectors and devices which are commonly used in PCB’s. The tool is very easy to use. It is just a drag and drop and make connections to join different ports. In our PCB design, we used a lot of connectors with different pin configuration for various peripherals ranging from 3-pin to 20-pin connectors.
Eagle PCB Design Tool
The PCB layout editor allows back annotation to the schematic and auto-routing to automatically connect traces based on the connections defined in the schematic. The layout of the devices and interconnections on the board showcases both the top and bottom layers. The blue lines indicate the connection made from the bottom and red lines from the top. We have used through holes to avoid shorting the pin connections.
We planned the design and positioned the components to ease the accessibility of the pins and ports. We designed a custom 3.56x3.16 inch PCB to integrate different modules together along with the SJOne board. In order to minimize noise, a power copper layer as well as a ground copper layer were added to the top and back of the board. This cleaned up the wiring a lot, since every component contained these wires.
After the schematic and board files were completed, we chose PCB fab company called PCB Way since they deliver the PCBs very fast and it is also cost effective. This company is known for reliability, and quick turn around time. In addition to this, their website is very user friendly and designed for hobbyist. We submitted gerber files along with .sch and .brd files. We chose FR-4 grade printed circuit boards (PCB) because they are flame-resistant. FR-4 is a composite material composed of woven fiberglass cloth with an epoxy resin binder. Our design went through the design checking process and when approved, they were manufactured. In total, the PCB took days from submission of payment to receiving the board. We also coordinated with other teams and ordered PCB together to share the shipping cost.
Connector List
EAGLE Connector List
| Purpose | Connector Type | Library | Package | Device Name | Port |
|---|---|---|---|---|---|
| SJSUone Board | 4x17-pin | SparkFun-Connectors | 1X17_NO_SILK | M17NOSILK (M17) | |
| Text To Speech | 1x6-pin | SparkFun-Connectors | 1X06_NO_SILK | M06NO_SILK_FEMALE_PTH (M06) | UART3 |
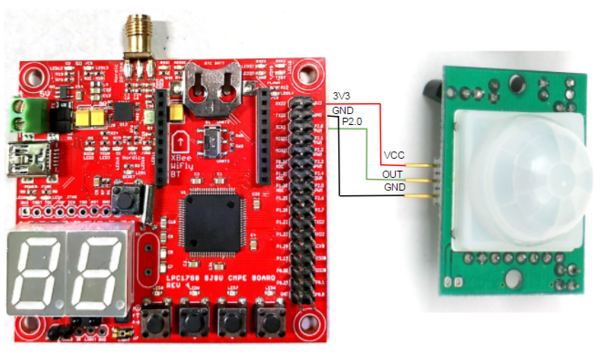
| PIR Sensor | 2x5-pin | SparkFun-Connectors | JST-5-PTH | M05JST (M05) | Port 2.0 |
| Electric Door Strike | 1x4-pin | SparkFun-Connectors | JST-4-PTH | M04JST- PTH (M04)
Port 2.1 | |
| 1-Channel Relay | 3x3-pin | SparkFun-Connectors | JST-3-PTH | M03JST- PTH (M03) |
PIR Motion Sensor
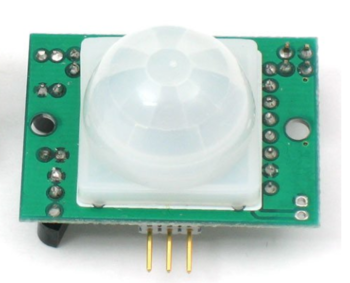
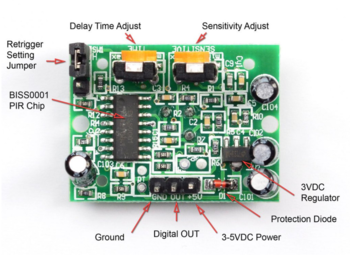
PIR (Passive Infrared )Motion sensor is an inexpensive, small sensor used to detect the human motion. The sensitivity or the range of the PIR sensor is 6 meters(or 20 feet) and works on a 5v input power supply.
Hardware Design
Discuss your hardware design here. Show detailed schematics, and the interface here.
3D Printing for PIR Mount
Dimensions:
CURA software
Software Design
Electric Door Strike
One Channel Relay
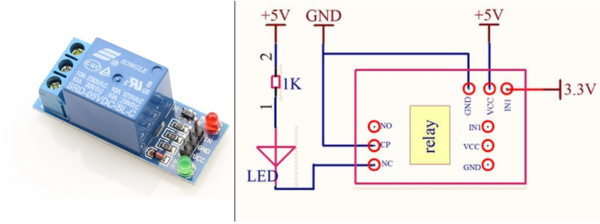
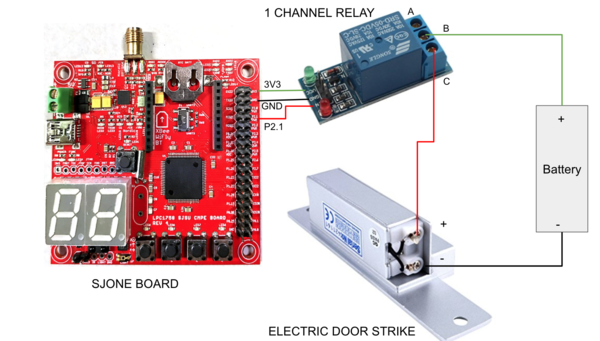
We have used a 1-Channel relay to control the Electric Door Strike from GPIO. The 1-Channel relay is active low circuit and the A and B are internally connected by default(NC). When a input of logic 1 is applied from GPIO to the relay, since the relay is active low, there will be no connection between B and C(NO). The circuit is not complete and so the Electric Door Strike will be locked. On the other hand, when a logic 0 is applied as Input to relay from GPIO, the B and C will be connected which completes the circuit. Hence the Electric Door Strike can be unlocked when the logic 0 is applied.
We need a battery, 1-Channel Relay and SJOne board to complete the Electric Door Strike circuit.
Hardware Design
Software Design
Mobile App
Hardware Design
Discuss your hardware design here. Show detailed schematics, and the interface here.
Software Design
Nordic Wireless
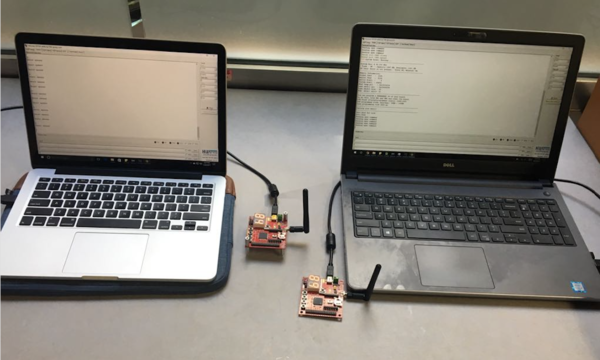
We have used Nordic Wireless communication to unlock/lock the Door 1 and Door 2 from the Main Door.
Hardware Design
Software Design
Text-to-Speech
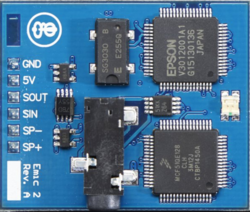
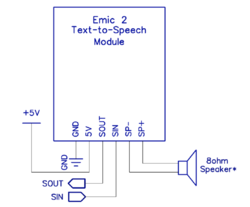
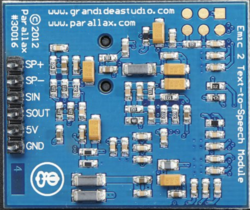
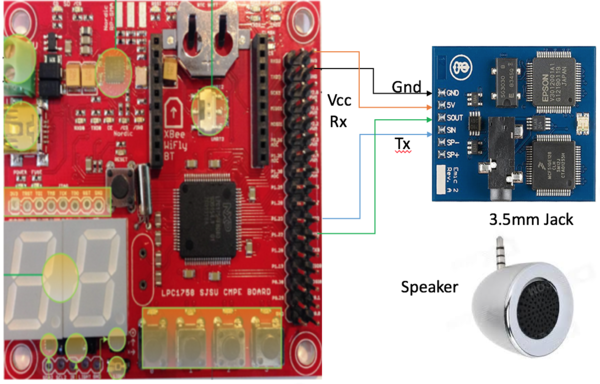
Emic 2 Text-to-Speech module converts the digital text to natural sounding speech. It uses UART to communication with the SJOne board. The Text-to-Speech (TTS) module is connected to the UART2 on the SJOne board. We can pick any voice from the 9 different voices and the volume can also be changed using the various commands. The in-built 3.5mm jack is used to connect the TTS to any speaker/earphones.
The key features are mentioned below:
- High-quality speech synthesis for English and Spanish languages
- Nine pre-defined voice styles comprising male, female, and child
- Dynamic control of speech and voice characteristics, including pitch, speaking rate, and word emphasis
- Industry-standard DECtalk text-to-speech synthesizer engine (5.0.E1)
Hardware Design
Software Design
Show your software design. For example, if you are designing an MP3 Player, show the tasks that you are using, and what they are doing at a high level. Do not show the details of the code. For example, do not show exact code, but you may show psuedo-code and fragments of code. Keep in mind that you are showing DESIGN of your software, not the inner workings of it.
Testing & Technical Challenges
Describe the challenges of your project. What advise would you give yourself or someone else if your project can be started from scratch again? Make a smooth transition to testing section and described what it took to test your project.
Include sub-sections that list out a problem and solution, such as:
Issue #1
A. The current was not enough from the SJOne board to unlock the Electric Door Strike. We initially decided to use a N-MOSFET as a switch to control the Electric Door Strike from GPIO pin but the N-MPSFET can only be switched on with 4V where the output from SJOne board is 3.3V. So, We have used 1-Chanel relay to enable the circuit.
B. Initially, we have planned to use a voltage regulator to supply 12V to the door strike from a 15V Battery, but the door strike is working from the Battery input of 7.2V. Hence, Instead of using a voltage regulator and 15V Battery, we are directly using the battery input.
Issue #2
Bluetooth Issue
Conclusion
This project was so much fun to work on. The project has increased our knowledge in both hardware and software know-how. We have interfaced PIR sensor, Text-to-Speech module and designed a mobile application to communicate over bluetooth. We got hands-on experience with the UART and Wireless communication. This project has provided an opportunity to delegate and work in a team. We defined our own objectives, overcame the challenges and successfully completed the project.
Project Video
Upload a video of your project and post the link here.
Project Source Code
References
Acknowledgement
We would like to thank Preet for the guidance and the support. The learnings in the class has helped us in the successful implementation of this project.
