Difference between revisions of "S16: Warriors"
Proj user6 (talk | contribs) (→References Used) |
Proj user6 (talk | contribs) (→References Used) |
||
| Line 226: | Line 226: | ||
* [https://cdn-shop.adafruit.com/datasheets/SIM808_Hardware+Design_V1.00.pdf Adafruit-SIM808] | * [https://cdn-shop.adafruit.com/datasheets/SIM808_Hardware+Design_V1.00.pdf Adafruit-SIM808] | ||
* [https://cdn-learn.adafruit.com/downloads/pdf/adafruit-huzzah-esp8266-breakout.pdf Adafruit-ESP8266] | * [https://cdn-learn.adafruit.com/downloads/pdf/adafruit-huzzah-esp8266-breakout.pdf Adafruit-ESP8266] | ||
| + | * [https://github.com/adafruit/Adafruit_ESP8266 Adafruit_ESP8266_Github] | ||
=== Appendix === | === Appendix === | ||
You can list the references you used. | You can list the references you used. | ||
Revision as of 20:40, 23 May 2016
Contents
Grading Criteria
- How well is Software & Hardware Design described?
- How well can this report be used to reproduce this project?
- Code Quality
- Overall Report Quality:
- Software Block Diagrams
- Hardware Block Diagrams
- Schematic Quality
- Quality of technical challenges and solutions adopted.
Project Title
Internet of Things based GPS Tracking System
Abstract
Internet of Things based GPS & GSM tracking system with a user-friendly web page interface that enables transportation industry to keep track of their vehicle with the timestamp. This project also involves the data collection from different sensors like the temperature sensor and the light sensor that can help to provide an alert if required conditions are not matched for carrying some sensitive goods like medicine.
Introduction
The project shows the implementation of Internet of Things based GPS tracking system with an add-on feature that is the collection of data from sensors attached to the microcontroller. The data is being stored on APACHE web server running on raspberry pi to eliminate the problem of memory storage space on the hardware. The output is being shown on the web page with a user-friendly interface that will show the latitude & longitude of the current location, temperature, and luminosity at every timestamp. The aim of this project is to make a tracking system with a user-friendly interface that can be used to track the route taken by the vehicle and ambience like temperature and light conditions so the owner need not worry about the illicit use of their vehicle.
Team Members & Responsibilities
- Ankit Gandhi
- Rasberry Pi environment setup, Hardware support
- Bharat Khanna
- Interface ESP8266 with ARM microcontroller, Hardware support
- Sujeeth Emmadi
- Veena Manasa Kanakamalla
Schedule
This section of the report provides the team schedule for the Assembly line project, indicating the milestones to be achieved during the course of the project.
| SI No. | Start Date | End Date | Task | Status | Actual Completion Date |
|---|---|---|---|---|---|
| 1 | 03/21/2016 | 03/27/2016 |
|
Completed | |
| 2 | 03/28/2016 | 04/03/2016 |
|
Completed | |
| 3 | 04/04/2016 | 04/10/2016 |
|
Completed | |
| 4 | 04/11/2016 | 04/17/2016 |
|
Completed | |
| 5 | 04/18/2016 | 04/24/2016 |
|
Completed | |
| 6 | 04/25/2016 | 05/01/2016 |
|
Completed | |
| 7 | 05/02/2016 | 05/08/2016 |
|
Completed | |
| 8 | 05/09/2016 | 05/15/2016 |
|
Completed | |
| 8 | 05/16/2016 | 05/22/2016 |
|
In Progress |
Parts List & Cost
| Item# | Part Description | Vendor | Qty | Cost |
|---|---|---|---|---|
| 1 | Raspberry Pi | Adafruit | 1 | $39.95 |
| 2 | ESP8266-Wifi Module | Adafruit | 1 | $9.95 |
| 3 | SIM808 GPS/GSM Module | Adafruit | 1 | $49.95 |
| 4 | Passive GPS Antenna uFL | Adafruit | 1 | $3.95 |
| 5 | USB to TTL Serial Cable | Adafruit | 1 | $9.95 |
Design & Implementation
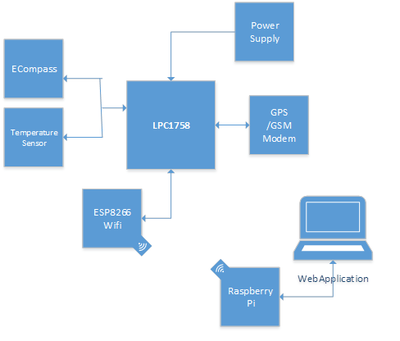
The design section can go over your hardware and software design. Organize this section using sub-sections that go over your design and implementation. Block Diagram
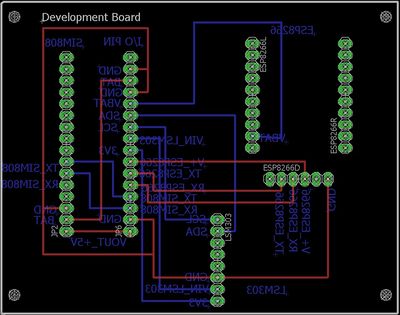
Hardware design for GPS, LSM303 and ESP8266 interface. peripheral interface board design
Raspberry Pi
- Raspberry Pi is powered with Broadcom BCM2837 1.2GHz 64-bit quad-core ARMv8 processor.
- Integrated 802.11n wireless LAN
- Raspberry Pi is used as Web Server
SIM808 GPS/GSM Module
- Raspberry Pi is powered with Broadcom BCM2837 1.2GHz 64-bit quad-core ARMv8 processor.
- Integrated 802.11n wireless LAN
- Raspberry Pi is used as Web Server
ESP8266 Wifi Module
- Raspberry Pi is powered with Broadcom BCM2837 1.2GHz 64-bit quad-core ARMv8 processor.
- Integrated 802.11n wireless LAN
- Raspberry Pi is used as Web Server
Hardware Interface
The hardware design includes PCB designing using cadsoft Eagle(software for PCB board designing). The circuit of developed PCB board includes interfacing peripheral like SIM808(GSM/GPS module), ESP826( Wi-Fi module), LSM303(Accelerometer & Magnetometer) with ARM cortex-M3 microcontroller and raspberry Pi. I2C, UART and TCP/IP are the three communication protocols that are being used in the project for establishing communication between temperature/light sensor, SIM808/ESP8266 & raspberry pi and ARM microcontroller respectively.
Software Design
The software has been developed on FreeRTOS using C/C++ programming language including features of real-time embedded system. The software involves device driver development for I2C and UART protocol which are used to establish communication between SIM808(GSM/GPS module) & ESP8266(Wi-Fi) with the microcontroller. The code also includes implementation of fetching data like latitude & longitude of the current location, temperature, and luminosity at every timestamp. The data that is being collected on real time basis from the peripheral devices is continuously transmitted to the server(Raspberry Pi) by ESP8266 module using TCP/IP protocol. Socket programming is written on the server(Raspberry Pi) which is continuously listening to the ESP8266 module. On receiving data from the client(Microcontroller) the data is being manipulated and is being able to be displayed on the user-friendly web page using PHP language.
Implementation
This section includes implementation, but again, not the details, just the high level. For example, you can list the steps it takes to communicate over a sensor, or the steps needed to write a page of memory onto SPI Flash. You can include sub-sections for each of your component implementation.
Testing & Technical Challenges
Describe the challenges of your project.
- First and very important aspect for any project is requirement gathering.
Make a smooth transition to testing section and described what it took to test your project.
Include sub-sections that list out a problem and solution, such as:
Issues
#1 LPC17xx UART Rx FIFO
- LPC17xx UART not able to receive more than 16 bytes
- Resolution :
- Used interuppt to solve this problem.
Conclusion
The project is based on embedded platform, implementing the concepts of semaphore, Task scheduling, queues etc. Addendum to this we have also implemented features of networking like socket programming and interfacing our output with a user-friendly interface on the web page using Internet of Things. This project helped us in learning a complete embedded application from hardware design till user interface that can be used at a commercial level.
Project Video
Upload a video of your project and post the link here.
Project Source Code
References
Acknowledgement
Any acknowledgement that you may wish to provide can be included here.
References Used
Appendix
You can list the references you used.

