Difference between revisions of "F15: Plant Control"
Proj 146u1 (talk | contribs) (→Software Design) |
Proj 146u1 (talk | contribs) (→Software Design) |
||
| Line 155: | Line 155: | ||
=== Software Design === | === Software Design === | ||
Show your software design. For example, if you are designing an MP3 Player, show the tasks that you are using, and what they are doing at a high level. Do not show the details of the code. For example, do not show exact code, but you may show psuedocode and fragments of code. Keep in mind that you are showing DESIGN of your software, not the inner workings of it. | Show your software design. For example, if you are designing an MP3 Player, show the tasks that you are using, and what they are doing at a high level. Do not show the details of the code. For example, do not show exact code, but you may show psuedocode and fragments of code. Keep in mind that you are showing DESIGN of your software, not the inner workings of it. | ||
| + | |||
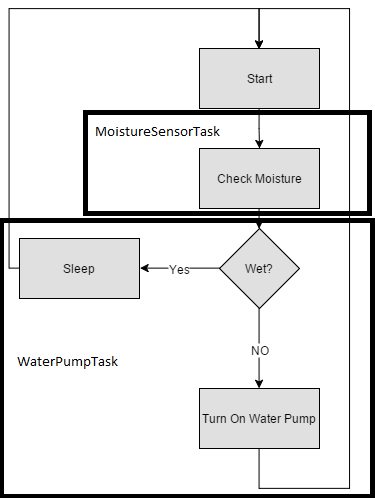
| + | [[File:CMPE146_F15_PlantControl_Software1.png]] | ||
[[File:CMPE146_F15_PlantControl_Software1.png]] | [[File:CMPE146_F15_PlantControl_Software1.png]] | ||
Revision as of 06:33, 17 December 2015
Contents
Automated Plant Control System
Abstract
The Plant Control project introduces a plant incubator which allows for resource and energy efficiency while producing healthy flowering and vegetation. The incubator will utilize an SJOne development board, its on-board sensors (light/temperature), a moisture sensor, and LEDs in order to autonomously provide the optimal moisture level for growth in any lighting. The owner of the plant control system can be confident that his or her plant is growing in perfect conditions and will be notified otherwise via an LCD screen.
Objectives & Introduction
This project is a self watering, self lighting, and temperature alerting plant grower.
The entire system is controlled via an SJOne Board which utilizes an LPC1758 Microprocessor.
In addition to the onboard sensors, the project will require interfacing to:
- RGB LCD Screen
- Moisture Sensor
- Water Pump
- PWM controlled LED
Team Members & Responsibilities
- Moises Negrete
- LED and Water Pump Driver Circuit Design
- Temperature, Light Sensor, PWM software
- Design and Build Planter
- Eduardo Lemus
- LCD Interface
- Source Code Task and Timing Cleanup
- David Chiu
- Moisture Sensor Interface
- Power Regulator Circuit
- Design and Build Planter
Schedule
| Week# | Date | Task | Actual |
|---|---|---|---|
| 1 | 10/24 | Research best lighting, temperature, moisture conditions | Completed |
| 2 | 10/30 | Purchase necessary equipment, and begin testing equipment (sensors) | Completed |
| 3 | 11/06 | Interface Sensors | Completed |
| 4 | 11/13 | Interface LEDs and Water Pump | Completed |
| 5 | 11/20 | Begin Building Planter | Completed |
| 6 | 11/27 | Finish Building Planter & Begin RT Code | Completed |
| 7 | 12/2 | Functionality Testing and Prototype Verification | Completed |
| 8 | 12/9 | Plant Flower and Field Test | In Progress |
Parts List & Cost
| Part Name | Cost | |
|---|---|---|
| Water Pump | $6.99 | http://www.amazon.com/gp/product/B00MP4Q6K2?psc=1&redirect=true&ref_=ox_sc_act_title_1&smid=AAOUP5IQ82N49 |
| Soil Hygrometer | $6.11 | http://www.amazon.com/gp/product/B00KKQYW76?psc=1&redirect=true&ref_=ox_sc_act_title_1&smid=AIOZ1JWV33B58 |
| 1/2 gallon Water Reservoir | $7.00 | Auto Zone |
| Faux-Ceramic Planting Pot | $5.00 | Home Depot |
| Baby Mums (Flowers) | $2.00 | Trader Joes |
| SJone Board | $80.00 | SJSU |
| Soil | $10.00 | Home Depot |
| 12V Power Adapter | $6.00 | Anchor Electronics |
| LCD Screen | $13.90 | http://www.seeedstudio.com/depot/grove-lcd-rgb-backlight-p-1643.html |
| 7805 Voltage Regulator | $0.50 | Anchor Electronics |
| Total | $136.6 |
Design & Implementation
Hardware Design
The hardware design for this projects will be split into the different sections of our project. The different hardware components include a power circuit and water pump/LED drivers. The
Hardware design will then be followed by the Hardware interfacing components.
Power Circuit
Due to the low power outputs of the LPC1758. in order to drive the LED and the the water pump,
an external power source strong enough to do so is necessary.

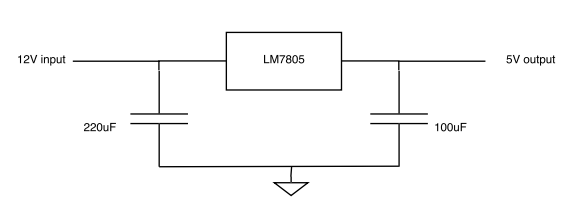
Figure 1. Power Regulator Circuit (12V-5V)
In figure 1, the power circuit uses 2 capacitors (100uF and 220 uF) to maintain stability of the regulator. The LM7805 is used to convert 12V to 5V as needed to power the LCD screen, drive the LED,
and the motor. A switch was added at the 5V node in order to be able to switch on and off the 5V.
Water Pump/LED Driver
[[[CMPE146_F15_PlantControl_PWM.png]]]
Hardware Interface
In this section, you can describe how your hardware communicates, such as which BUSes used. You can discuss your driver implementation here, such that the Software Design section is isolated to talk about high level workings rather than inner working of your project.
Software Design
Show your software design. For example, if you are designing an MP3 Player, show the tasks that you are using, and what they are doing at a high level. Do not show the details of the code. For example, do not show exact code, but you may show psuedocode and fragments of code. Keep in mind that you are showing DESIGN of your software, not the inner workings of it.
Implementation
This section includes implementation, but again, not the details, just the high level. For example, you can list the steps it takes to communicate over a sensor, or the steps needed to write a page of memory onto SPI Flash. You can include sub-sections for each of your component implementation.
Testing & Technical Challenges
Describe the challenges of your project. What advise would you give yourself or someone else if your project can be started from scratch again? Make a smooth transition to testing section and described what it took to test your project.
Include sub-sections that list out a problem and solution, such as:
My Issue #1
Discuss the issue and resolution.
Conclusion
Conclude your project here. You can recap your testing and problems. You should address the "so what" part here to indicate what you ultimately learnt from this project. How has this project increased your knowledge?
Project Video
Upload a video of your project and post the link here.
Project Source Code
References
Acknowledgement
We would like to thank both Preetpal Kang and Dr. Haluk Ozemek, for their limitless support and encouragement throughout the semester.
The knowledge and skills gained in CMPE146 were paramount to the completion of this project.
References Used
Soil Hygrometer
LCD RGB Backlight
2N7000 Transistor
Voltage Regulator
Appendix
You can list the references you used.
